Sine sweep method
Creating an Impulse Response of your cabinet can be quite useful when it comes to mixing or recording, specifically at home.
It gives you the ability to switch around and tweak your sound after you have recorded without the hassle of having to re-record what you had previously recorded. It also eliminates the loud noise generated from a physical speaker which limits your choice of location when it comes to producing music.
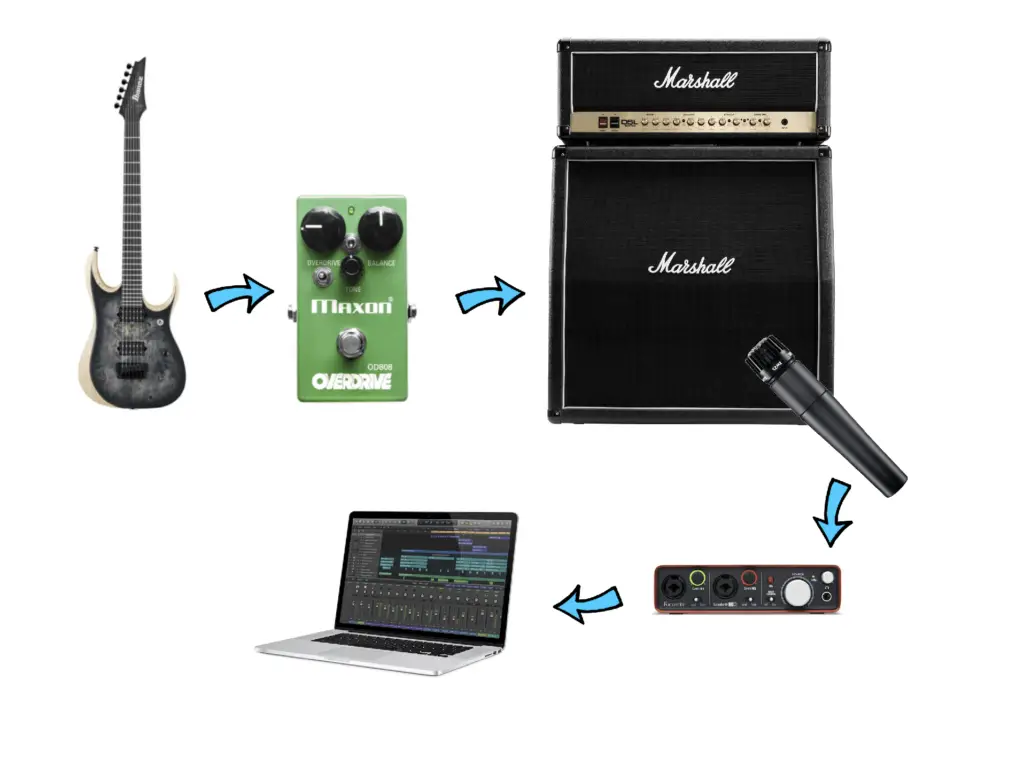
To start recording an Impulse Response of your cabinet you will need to have an Amplifier with an Effects Loop, A Soundcard capable of sending and recording a signal simultaneously and a Microphone, so you can hook it up with your computer/DAW and actually get a good signal in and out.
Once you have hooked up everything together with your rig, you are ready to mic up your cabinet and start looking for that “sweet spot”.

Easiest way to do this is have one person playing the guitar with headphones on, hearing the input of the Microphone while giving directions to another person who is moving the Microphone across the cabinet.
Once you finally found the spot you want to record, you will now change around some things in your rig so that the computer can send a signal through your amp/cab and also pick the signal back up using the microphone that you’ve placed earlier.
- First you need to have a cable going from 1 of the Outputs of your soundcard, into your Amplifier. You need an Amplifier that has a Effects Loop, this is where the cable goes – into the Return of the Effects Loop. This allows you to bypass the pre-amp of your amplifier and only use the power-amp that drives the actual cabinet.
- The Microphone should already be in place and going into your input of the Soundcard.

Now that you have a rig set up and ready for recording and creating an Impulse Response, What you need to do now is download a Deconvolution software so that you can create an Impulse Sweep you will be sending through your cabinet.
The Impulse Sweep is basically sending frequencies through your cabinet from 10hz up to 10khz letting you record how the cabinet reacts to each of the frequencies.
For PC users you will have to download and use Voxengo Deconvolver.
Here is a great Video that explains how to use Voxengo – and record an Impulse Response in general really well.
For Mac users that happen to use Logic, there is a native program within the Logic App called Impulse Response Utility that helps you with this exact thing.

Open up the Impulse Response Utility and you will see the following;

Choose the correct input so that it has the input of the microphone, and the output so that the signal is sent out of your Soundcard and into your amplifier’s Effects Loop.
Choose the channel corresponding to your output regarding the sweep, and switch between the different Test Tones to make sure that they don’t peak the signal and adjust your sweep level accordingly.
When everything is to satisfaction you click “R” to arm the rig for recording.
Make sure everyone and everything near the speakar/microphone is silent so the sweep recording doesn’t get disturbed.
You can adjust the length of the sweep, i usually just keep it at around 10 seconds to make sure every frequency gets picked up. The Reverb time should be set as low as possible.

After you’ve recorded your sweep you can trim the recording down by dragging on the visual screen, try and trim away the start until you see where the audio-waves start to form.
Doing this makes it easier to use the Impulse Response you have created together with other Impulses in the future if you would want to blend and mix around with them.
Now that you are done recording and trimming, click “Create Setting”.
It will be saved as a .SDIR file which is used by Logic’s Space Designer plugin. What we want to do now is convert this file into a .WAV file.
For this i use a program called X Lossless Decoder(XLD).
It’s a tool for Mac OS X that is able to decode/convert/play various ‘lossless’ audio files.
Opening the .SDIR file through XLD automatically creates a .WAV version of that same file, Resulting in your new Impulse Response.
White burst method
There is also another method of capturing and creating an Impulse Response, by using a White Burst or Pink Burst noise instead of a Frequency Sweep.
The difference between the two methods is mainly that the Frequency Sweep goes through the whole spectrum within a certain time frame (depending on how long your sweep is), while the White/Pink Noise Burst basically sends all the frequencies at the same time. The White/Pink Noise Burst in this scenario consists of the full frequency spectrum at the length of 1 sample length. Both Methods are debated, whether one is superior to the other. I personally prefer to utilize both methods depending on the situation and what I am recording.
Recently I have started to prefer using White/Pink Noise when creating Impulse Responses out of Guitar and Bass Cabinets. It is much more time efficient and it does not require a complex algorithm to extract the difference between the recorded audio and the original source.
To record an Impulse Response utilizing White/Pink Noise i first set my Rig up the same way that i would use a Frequency Sweep.
- I open up my DAW and create several Audio Tracks
- First Audio Track is used for sending the signal through my rig. No input needs to be selected here, I just select the output going into the rig.
- Secondary Audio Track(s) is used for recording the signal coming out of the rig, I select the input for the corresponding microphone(s), Output on these channels are not necessary.
- On the first Audio Track i place a sample consisting of the White/Pink Noise Burst, You can download the sample Here.
- Ready all secondary Audio tracks with inputs for recording, and record the Sample going through your Rig.

I usually record a little bit more than the actual length of the sample to make sure that I capture the ending clearly. If you want to take things a step further you can even add a little recording time before the sample kicks in as well, Like i have done in the next example.

What i do after this is trim off the beginning to where the actual audio of the sample kicks in. This phase aligns the Impulse Response so that you can effectively blend it with other Impulse Responses.

The part i have marked in green basically is your finished Impulse Response, The only step i suggest doing before you bounce the green part out to a .WAV file is that you then Normalize the Impulse Response, This guarantees that you maintain the DB of the Signal going in, and not risk losing any Volume to your final signal.
Here you have a good tutorial on How to create your own impulse responses w/ Andrew Wade from URM Academy, i Highly suggest you check it out!
0 Comments